Stitch Out
A browser-native embroidery file analysis and visualization tool supporting five major formats, built to bridge the gap between embroidery software and machine-ready quality control
Technologies Used
Downloads
Try out Stitch Out with my non optimized original pumpkin file
Download Pumpkin file ↓Try out Stitch Out with an optimized gnome file
Download Gnome file ↓Overview
Stitch Out is a self-contained, browser-native tool for analyzing and visualizing embroidery machine files. It parses binary format files directly in the browser—no server, no uploads, no dependencies—and surfaces actionable quality data before a single stitch hits the machine.
The tool supports five major embroidery formats (DST, EXP, JEF, PES, VP3), each with format-specific coordinate handling and a standardized quality scoring pipeline. It also includes an animated visualizer for generating social media content from stitch data.
The project emerged from my lack of knowlege of what made a good embroidery file and an interest in learning how tools like Claude Code could assist someone like me.
Backgound and Problem
Living in the south you see a lot of embroidered objects like shirts, dresses, and bags. When my daughter was born my wife bought a few items for her and being someone who loves to learn new skills and also buy a new toy I thought “I could do that”. I have a design background and have made vinyl decals and birthday cards for my Cricut using Illustrator and Affinity in the past. So I did what I do best and dove straight into the deep end watching tons of videos on consumer machines and how to make embroidery files. After lots of research and going back and forth of whether or not to buy a machine I did. I ended up with a Bernette B70, why, becuase I could get one locally and the Black Friday deal I found came with digitizing software. Digitizing is essential to making your own designs but the software is really expensive, the Bernina digitizing software that came bundled with my machine retails for $1,299, which is almost as expensive as the machine I bought.
My problem ended up being that digitizing itself is a skill and an art. I was able to watch enough Youtube tutorials to make a basic design, but once I started to push past that I started to run into issues. My projects would start off well but then they would start to fail, bunched up thread, and broken needles.
What I was lacking was the feedback of an instructor that knew what they were doing and could tell me why my design would possibly fail if I ran it on the machine. I could have gone and bought courses that would teach me the basics, but it’s a niche market and high quality courses meant spending more money than I wanted to spend at the time. I could also have bought
all my designs off of Etsy or paid to have them digitized, but Etsy is a dice roll of quality and why have someone else make the files when I had all the tools already. Eventually my embroidery machine started to collect dust, sitting on my desk reminding me of my lack of skill.
Solution Approach
My solution ended up being the want to learn about AI more. Videos kept popping up on my youtube about how people were vibe coding full apps with no coding experience, and while that was intriguing I pushed back on that idea. I have a really small programming background, I learned Visual Basic in high school, started college wanting to be a computer engineer learning C++, joined the robtics club in college and wrote C to make robots work, and used C# and Unity to build XR prototypes when I worked at NASA. I would not call myself a developer, I don’t have the skills to build something from start to finish, just bits and pieces. I had pushed back on vibe coding because I told myself that I wanted to write the code of the projects I built. Ultimatley that was holding me back, I have a lot of ideas in my head but always lacked the skill to execute, the launch of Claude Code and Opus 4.5 started to make it seem like I could start to bring some of the ideas I had to life.
So back down the rabbit hole of consuming lots of tutorials and best practices videos on Youtube I went. I needed an easy project and this seemed in my head like something that wouldn’t be to complex. My initial project was can I build a web based viewer of my embroidery files, if this worked I’d expand the scope.
I started off as simple as it got, no CLI tools, no VSCode, just Claude.ai and a single prompt of “I want to investigate the possibility of building an visualizer for embroidery files.” and what followed was a conversation about how embroidery files worked in particular EXP files since that’s what my machine used natively. Why the conversation and not just tell Claude I wanted to build a EXP visualizer? I like to learn I didn’t want AI to be a black box where I give it a task and it magically comes back with a solution that I didn’t know how it worked. After talking it out my plan was to build a parser first and visualizer second.
Amazingly the parser worked after the first attempt, I’m not sure if it was luck or having Claude talk it through with me that gave it more context. My next step was a visualizer something that showed me paths and stitches, again this worked fist try. This got me to think I could push the project further and now my goal was as followed.
- Upload a .exp embroidery file
- Analyze based off best practices
- Visually show me problem areas of my design
- Provide solutions on how to fix problem areas
My Approach
I knew from the beginning I wanted to try and push AI to see where the limits were in making a product. I had been unemployeed for a time at this point and had been applying to a lot of Product Manager roles, this was going to be a project where I acted as the Product Manager. AI would do all the cross functional work and I would help guide the vision of the project leaning on my technical and design background to shape the product but not get bogged down in the complicated parts that I knew I didn’t have the skills to code.
Technical Implementation
Initial EXP Parsing
For the initial EXP parsing I leaned heavily on Claude. Claude did the reesearch on the format, provided me with the information and then built the parser with no input. It worked but in the future I found some errors once I expanded the capabilites.
The initial parser would just provide me back with details about the design I had uploaded. I knew details like stitches, colors, and trims since I had digitizing software. This allowed me to verify that the information that the parser was providing was correct.
Jumping to the future for a second I eventually found the EduTech Wiki which had technical breakdowns of the formats of a few common embroidery file formats. I used this website extensively to help guide Claude to build the parsers the right way rather than it’s way.
Initial Visualization
Next step was the visualizer. This started off as a simple task of plotting all of the points that the parser was finding and then connecting the points with a line to visually show me what the design looked like. Super simple addition to the project and Claude was able to tackle it with no problem building a web interface that popped up right next to my chat window.
Claude took the visualizer prompt built the following, a canvas renderer that supports five modes switchable without re-parsing:
- Normal — thread colors per color block
- Density — 10×10 grid heatmap (red = high density)
- Sequence — rainbow gradient mapped to stitch order
Quality Analysis Engine
After I got parsing and visualizer concepts working that really got my wheels turning on what I could build. My next thought was could I analyze my designs and have my webapp provide me feedback. I gave Claude the task of searching the internet for the best practices of machince embroidery and to come up with a way of analyzing the file that was uploaded.
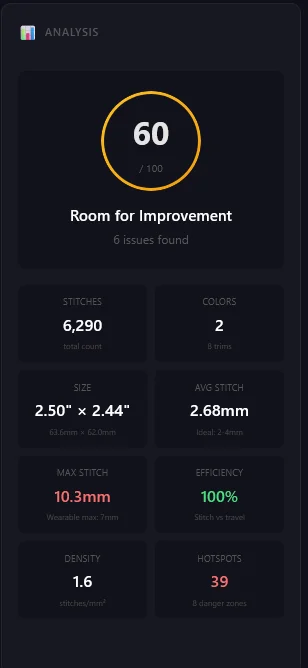
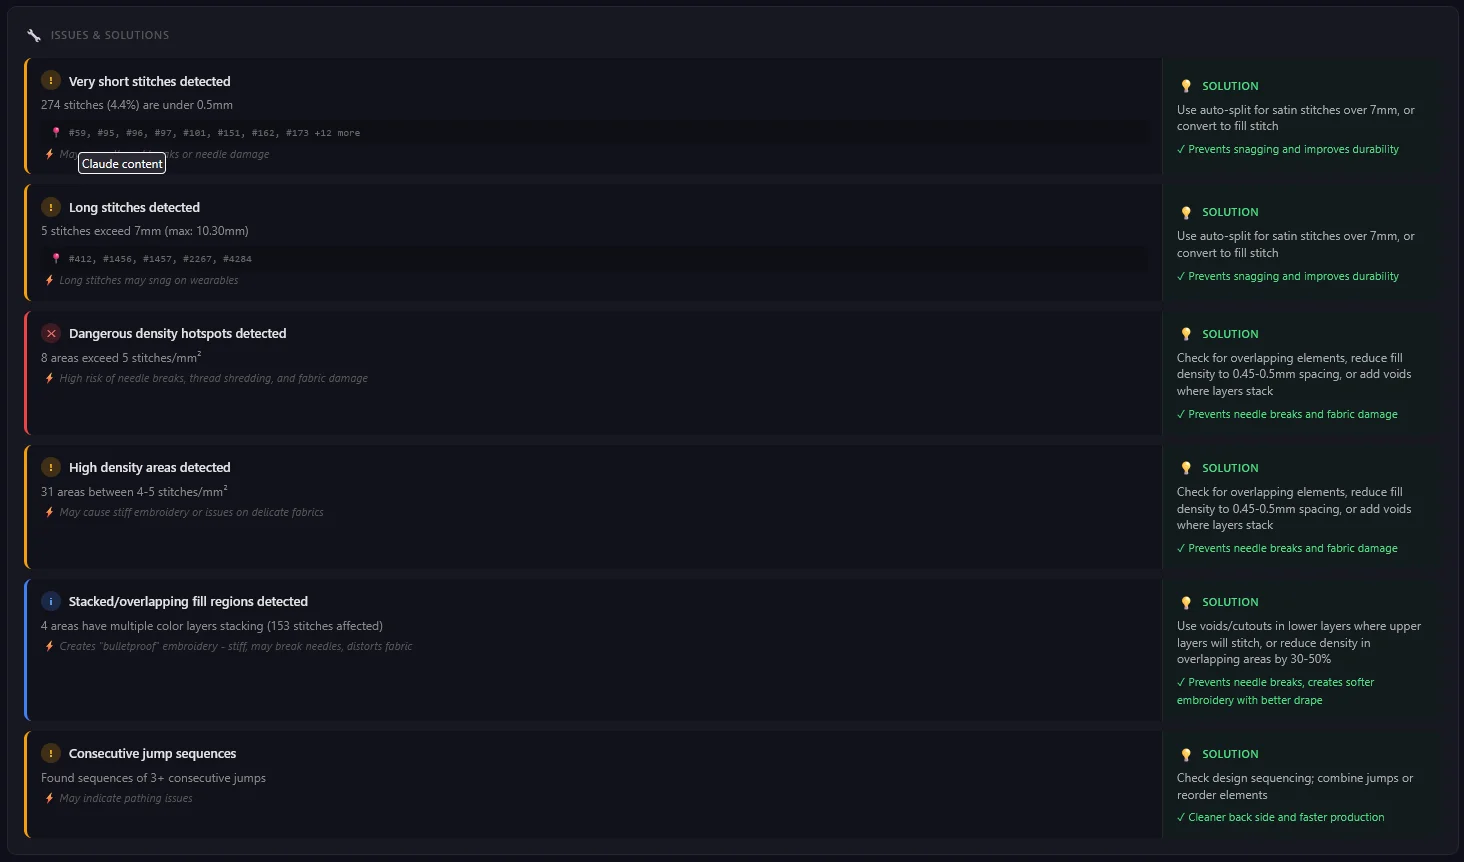
The analyzer runs after parsing and produces a composite 0–100 score weighted across:
- Stitch lengths — flags stitches exceeding 7mm (wearable max) or 12mm (absolute max before auto-trim risk)
- Density — grid-based heatmap detection of regions exceeding 6.0 stitches/mm², flagged for puckering risk
- Pathing efficiency — ratio of actual travel distance to ideal minimum; targets above 95%
- Jump and trim ratios — consecutive jump detection, trim ratio thresholds at 1% (warning) and 2% (high)
- Color sequencing — detects unnecessary color changes and flags re-color opportunities
Each issue is paired with a specific, actionable recommendation rather than a generic warning.
The visualizer was updated to support:
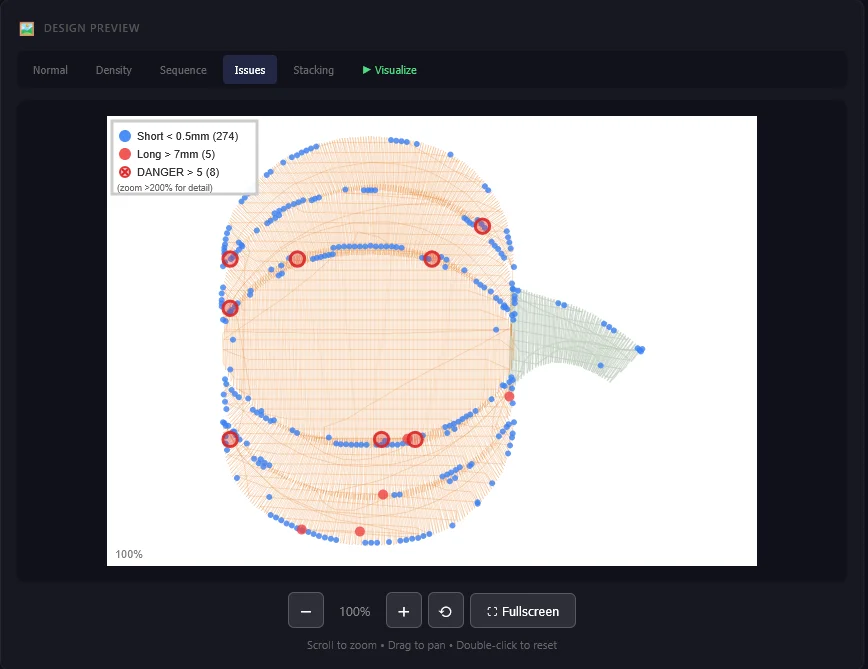
- Issues — highlights long stitches and problem zones in red
- Stacking — alpha-blended overlap detection
The analyzer is really generic and I know that, I told Claude to search the internet and determine best practices. Ideally there are best practices for different types of fabric, but that’s a task for future me if the need arrises that I build that feature out more. I didn’t want to add scope creep and keep adding features just because I could.
Analysis Results
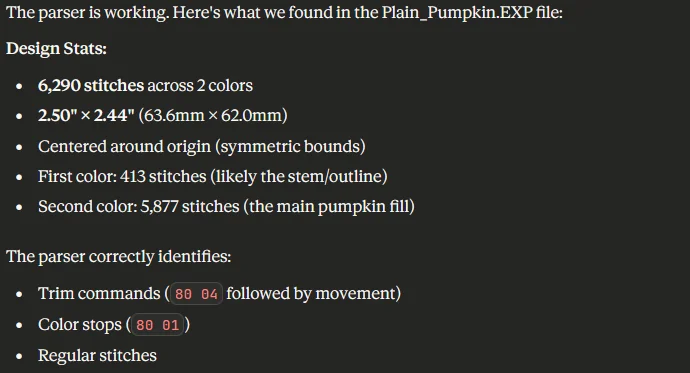
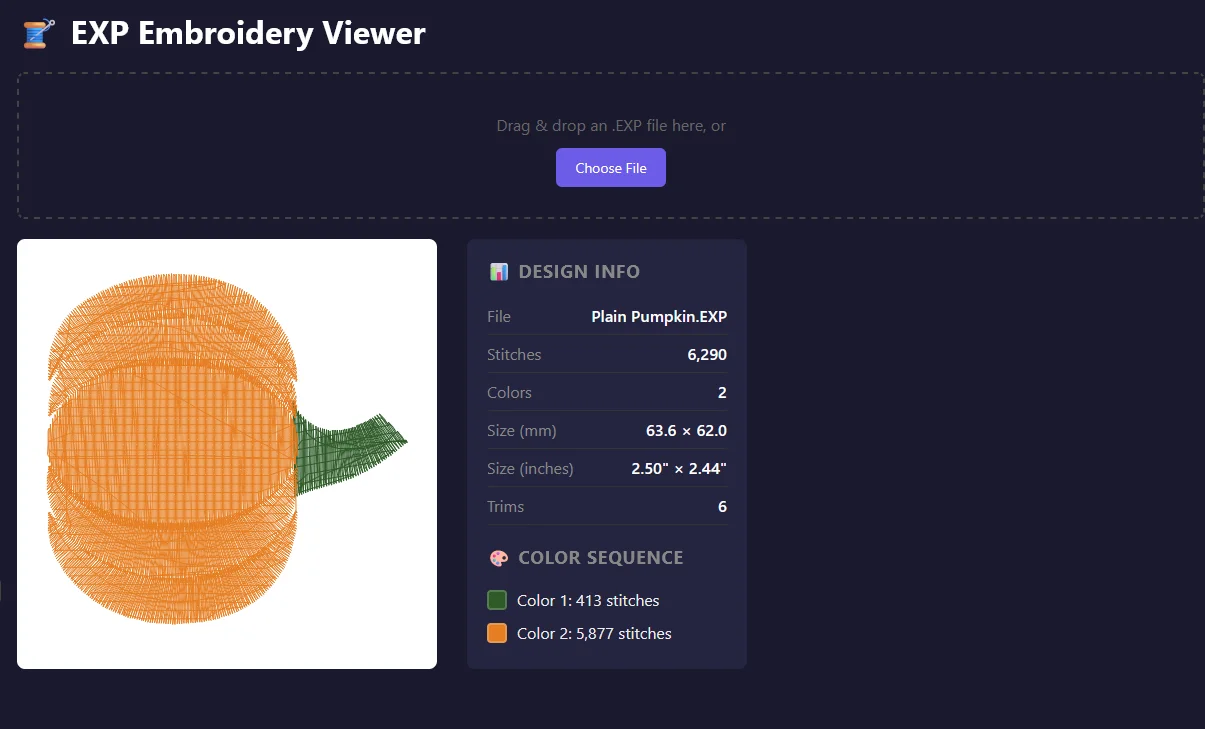
The results came right away. The first file I uploaded was one I created myself, a pumpkin that I had made thinking that I’d put it on a shirt for my daughter for halloween. My initial stitch out of that design was a mess of thread and a broken needle, and I had no idea why that had happened. I knew it was due to my lack of knowledge but I didn’t know what the problems were or how to fix them.
uploading that file into my analyzer gave me back the feedback that I wanted. My pathing was optimal but the density was an issue. One thing I noticed when zooming into the file was that my analyzer was only taking into account stitches in the order that they occured. It caught stitches that sequentually were within 5mm of each other and called those out, but it didn’t catch if I had another section that overlapped and also was within that minimum distance. A quick conversation with Claude and now the analyzer was looking at all the stitches when scoring my design.
Re-uploading my design to the new version gave me back feedback that my deisgn could cause issues including the breaking of needles, exactly what happened to me. My analyzer also provided feedback as to how to fix the problem. This was turning out to be something that I knew would be useful for me and could possibly be useful for other hobbiest like myself that are trying to learn digitizing but are having trouble.
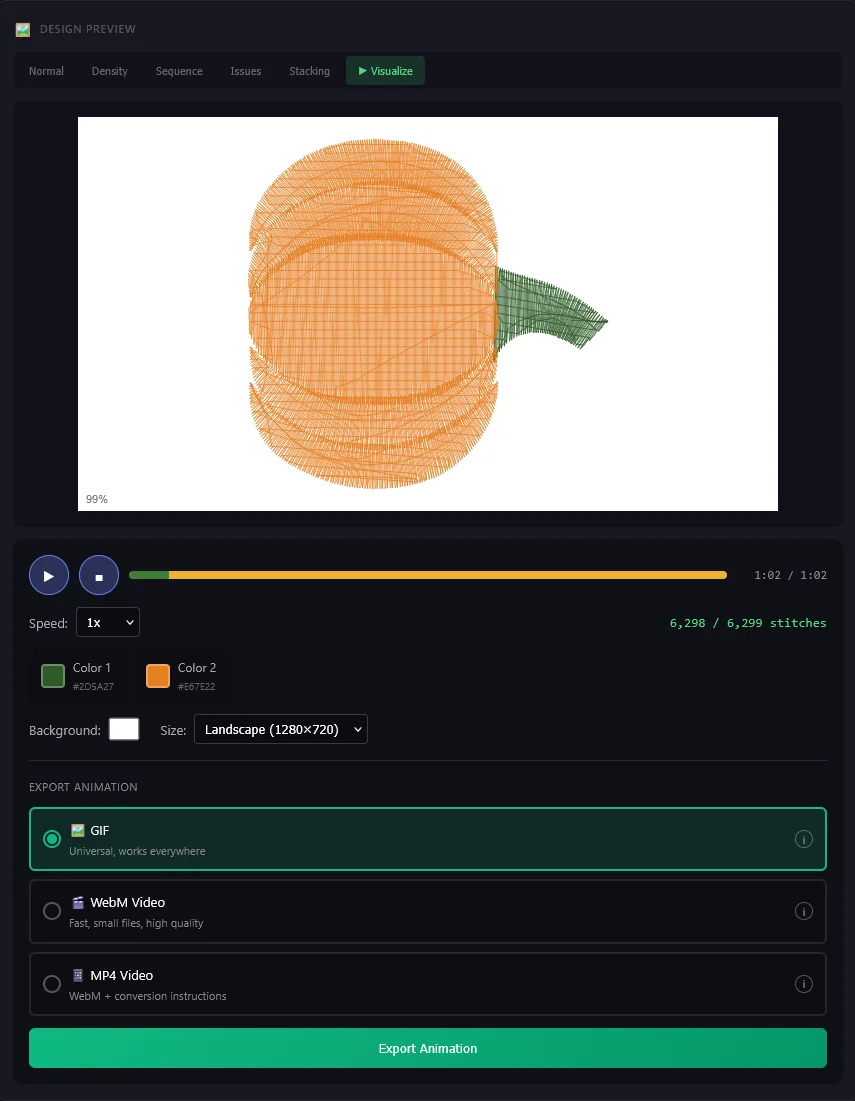
Animated Visualizer
With parsing and analysis to a point where I was happy with them I came up with a new idea. Could I extend the visualizer to animate the embroidery process? Why? First because we live in a time of social media and being able to post not just a picture of my design but also an animated video of it actually stitching out I thought was a good idea. Second was if I ever wanted to put my designs up for sale on Etsy or some other shop, I thought that having a video of the process might be good insight for the customer to see that my design wasn’t poorly digitized before they pought it.
Initial playback was simple, play/pause of the uploaded design but it later evoled into this:
- Speed controls — Playback from 0.5× to 10×, useful for exporting
- Colored timeline — The timeline was colored to show what color thread was stitching at that time
- Thread color — Select what color thread you want each seciton to be. Currently I only have basic thread colors for Brothread, Isacord, Madeira, and Sulky
- Hex color fallback — If I don’t have a specific thread that you want you can always input a hex code that matches your color
- Social media size presets — 1080×1080, 1080×1920, 1280×720. Ideal for Instagram, TikTok, or Etsy
- Export support — Export a gif, webM, or mp4
Extending Parsing Capabilities
I initially built my analyzer to utilize EXP files because that was what my digitizer defaulted to and what my machine read. I knew that not everyone had the same machine and also didn’t use the same file formats for their machines so I decided to take on the task of building more parsers for the formats that My next goal was a PES parser and I couldn’t get it to work by just prompting Claude to use the EXP parser as a roadmap and build a PES parser. I kept getting the wrong results and Claude kept going in circles. This got me to slow down, look at the problem and rely on my experience to go looking for technical documentation on how the file is structured. I found this website EduTech Wiki and that really helped me guide Claude feeding it exactly what I wanted while providing it with all the technical specifications that it needed. PES parsing started working properly and I decided why not implement the other formats that were on this site for all the other people that had different machines and used other formats. I had professionally created files files for each of those formats from a previous project so I went down the list one by one until I had a parser that could successfully parse the files with minimal errors. In the end I had individual parsers for the following formats:
- EXP
- DST
- PES
- VP3
- JEF
Parser Analysis
All the parsers worked but they weren’t perfect. I had my single design in all those formats so I built a spread sheet containing all the details that knew:
- File Extension
- Total Number of stitches
- Height
- Width
- Colors
- Colorways
- Stops
- Trims
- Objects
Utilizing this spread sheet I uploaded the five design files to Claude and told it to build me a report that compared how my parsers compared to the real numbers. The results were varied, a few catagories like colors, stops, and size were right on but the stitch counts, and trims were way off. So I picked my original EXP parser and tackled the stitch count discrepencies that I had. After interviewing Claude it turns out it was not counting things like trims and jumps as a stitch so my missing stitches quickly were found. With my EXP parser meeting 100% of my tests I had Claude build a md file that went into it’s structure, formatting, and export settings. Something I should have done from the start before building the other parsers but not to late to implement as I went through them one by one fixing the issues my report had found.
I spent 1-2 days chatting with Claude to solve all of my parsers issues and implementing the format changes that I had set with the EXP parser. Most things were quick fixes since the majority were stitch count issues or the format that the function returned the data and I had my new documentation built from the EXP parser. The harder tasks were with the DST parser because it doesn’t natively have a trim command. The machine has to know how to trim the thread, so I started reading the format documentation and eventually found my issue. Instead of a trim command it used between 3-5 jump commands in a row and that told the machine to trim. Knowing this I had Claude build that into the DST parser and eventually I had a stored amount of trims that could be passed to the analyzer.
With all my parsers matching my known records 100% I considered the parsers complete and exported each one as individual files to integrate into the larger project.
Aesthetic Decisions
Like the technical implentation I wanted to leave everything up to Claude initially. I didn’t design anything for this project other than eventually the logo. That’s not to say that I didn’t make design suggestions, I would adjust text sizes to make it more readable, tell Claude to merge sections that seemed like they would make more sense together rather than appart, and adjust the format of the section layout to feel a bit better on the UX side.
This project is still evolving and as I learn new tools and skills I’ll probably make adjustment. I will more than likely end up running the whole project through Claude’s Front-End Design skill and see what suggestions it has to better enhance the look and feel.
Design Decisions
Iniial Single-file architecture. — When working with the web based Claude the entire application—HTML, CSS, and JS—lives in one self-contained file. This was the only way that Claude could build and then run the webapp in the side view. This worked for prototyping but creates a monolithic file that I decided needed to be split out once the project grew in size. I had Claude analyze the project and then build a plan to split the monolithic file up into multiple smaller files when I transistioned the project to VSCode and Claude CLI.
Format-specific over universal parsing. — Early experimentation with a generic delta-coordinate parser broke on every format’s edge cases. Dedicated parsers per format, each with documented spec deviations, proved more reliable and more maintainable.
Validation-first development. — Each parser was built against test files with known stitch counts, dimensions, and color sequences. 100% match on those metrics before moving to the next format. No tolerance for “close enough.”
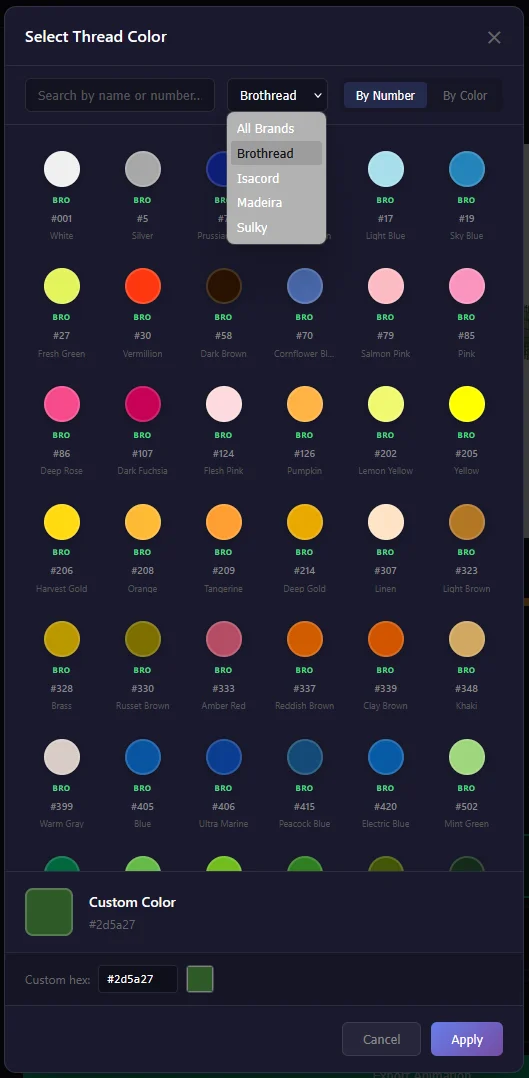
Real thread colors — Embroidery thread comes in lots of colors and from lots of brands. I knew I wanted the colors in my visualizer to match closely to the real thread. I found a website that converted major brands to hex values so that allowed me to have a color picker
that sorted based on brand as well as color family while still providing the brand specific color name and number identifier for easy color matching.
Results
- Five format parsers with 100% validation accuracy against known test specifications
- Sub-second parse and render times on files up to 50,000+ stitches
- Quality analysis pipeline detecting six issue categories with paired solutions
- Animated visualizer with functional gif, WebM, and mp4 export and social format presets
- Color matched thread with major brands
Takeaways
This was a fun project, something that was useful to me but also could possibly be useful for others. My main goal like I stated was to learn how to utilize AI and I felt like I learned a lot. Planning with AI really helps and Claude is pretty good at taking the input that you give it and building a plan from there and executing.
Do I think I could have built this purely by vibe coding? I don’t think so, as I stated before the initial PES parser was an issue until I stepped in and fed Claude the technical specifications that I had found.
AI isn’t a magic wand that can make anything. Sure it can make a simple project, it made my initial visualizer with basically no help from me, but once the scope got a little bigger and the project got complex it helped that I had some technical capabilites.
I don’t think AI in it’s current form isn’t going to replace me. However AI is giving designers, makers, and technically minded people another tool in their tool box to be able to build things that they couldn’t build before.
What’s Next
- UX Pass — Currently this is all Claude’s work. I’m going to take a pass at making more directed adjustments to make the page look and feel a bit less AI built.
- Deployment — Where am I going to post this for public consumption? Will it have it’s own URL or be a sub domain to my website
- Feedback — I built this in a vacuum for me, I want user feedback on if it’s useful for them and if not why
- Recipies — Different fabrics have different best practices, I want to adjust my analysis score and feedback based on these Recipies
- Realistic Rendering — Right now my visualizer is pretty basic with flat shading. Some digitizers render out each thread so that they have a 3D look, I might look into revamping the visualizer to appear more realistic.
- Specialty Threads — In it’s current iteration I only have the basic colored threads of the major brands. There are specialty colors like neon, glow in the dark, and metallic that I may want to implement.